After working with Xamarin for a decent amount of time I thought it would be useful to a lot of developers to share my experience with the platform and its ecosystem. I will discuss the matter based on a DevOps approach, since that is the approach I took. Note that I understand that there is much more to DevOps and that I'm covering only a small part of it.
So I decided to learn Xamarin and the company that I work for supported me by buying me a Xamarin license with University access. After watching a couple of courses I decided to jump in the
deep. I started with Android because I had some experience with native app development on Android. It surprised me that the Xamarin development experience was remarkably close to developing native on Android. Xamarin does a great job on matching the original native's development experience. And that was exactly the moment that I took a deeper dive into Xamarin. I wanted to know how Xamarin could match the native environment and how its works under the hood.
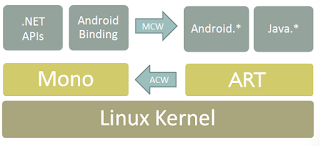
What Xamarin does is, is that they have created bindings that actually match Native UI calls. The .NET runtime will call the native OS features and, as misunderstood sometimes, will definitely not emulate them. This is one of the major advantages of Xamarin over web apps such as Cordova. The user will actually experience a native look and feel instead of a web based UI. Don't get me wrong web based UI's can have great user experience too but its hard to match the performance and user experience of the native controls.

So how is Xamarin able to call Native UI features from a .NET runtime? And does this work both on Android and iOS? Well the two platforms take a different approach. Lets start with
Android. Android Apps normally run the Android Runtime(ART). Its a Java virtual machine that's comparable to the .NET runtime. It also got JIT compilation and is able to execute dynamically created code. Xamarin Apps build for Android supply a second runtime next to the ART runtime, namely the Mono runtime. Mono is able to execute .NET compiled code, named IL(intermediate language) and JIT compile and execute it on the fly. The guys at Xamarin also added Android bindings to the runtime which enable you to execute ART code from your .NET code. This is the real power of Xamarin. It basically enables you to run .NET code in your App and next to that also use .NET code to execute native Android code which normally is only available in the Android Runtime.
But whats the difference with
iOS? Well Apple has made a very important restriction on iOS, namely:
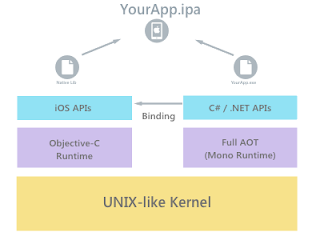
However, there is a security restriction on iOS, set by Apple, which disallows the execution of dynamically generated code on a device.

This restriction basically excludes JIT compilation from iOS, which is a fundamental part of the .NET runtime. This forced Xamarin to take a different approach on iOS. They came up with Ahead of Time(AOT) compiling, which is an alternative to Just in Time(JIT) compiling and is fundamentally different. Once you compile an App for iOS it will compile your App to machine code for iOS. The compiler for iOS is not open source and is not available outside of XCode and XCode is only available on a Mac. Thats why Xamarin developers for iOS are required to have a Mac.
Having this said, I would like to make one very important note on compilation for iOS. iOS simulators don't have the restriction of dynamically created code and Xamarin will in fact use JIT compilation on iOS simulators even if your simulator runs on a Mac. This can have serious consequences for your code. Some .NET features such as Reflection.Emit are by definition not available on iOS. You code may run fine on the simulator but once you run it on a real device there is a chance that it will crash. Its therefore very important to test on real iOS devices early in your development cycle.
Conclusively, in my opinion you are only ready to develop with Xamarin if you understand the architecture of Xamarin. You don't have to be an expert but knowing how your code is actually executed is very important. Its helps you to understand how your development environment should be setup and how to tackle certain problems.
Now that you know the basics of Xamarin I will elaborate on the tools that I have used and how they collaborate and support my DevOps cycle.
Development
Starting with my development environment. I work a MacBook Pro with a Windows Virtual Machine. This enables me to work with Visual Studio as well as Xamarin Studio, Android Studio and XCode.
Visual Studio is my favorite IDE. It's essential in a Microsoft orientated IT landscape and works great with Xamarin. The designers in Visual Studio are often even better than the native designers. Have you tried the Storyboard designer in XCode? The storyboard designer in Visual Studio is way better and delivers a far better User Experience.
One downside of using Visual Studio for Xamarin iOS is that you have to connect with a Mac over the network. This slows down the performance and sometimes your connection will become corrupt. Xamarin tooling isn't that stable and you will definitely encounter issues with connectivity and latency. If you encouter issues please take a look at the Xamarin Output Window. A whole bunch of stuff has to boot up before you will be able to communicate with your Mac.

If you want to work on a Mac and don't want to hook up a Virtual Machine with Visual Studio, you will have to use Xamarin Studio. Its a fair IDE with support for all kinds of features. You can definitely use it to build your Apps. However its not my favorite, Visual Studio is far more comprehensive. Its fast though. The main problem with Xamarin Studio is of course the lack of possibility to build other projects then your Xamarin projects. If you have for instance an ASP.net WebAPI project in the same solution as your Xamarin solution you will not be able to run and test using Xamarin Studio. You will however be able to build it. Another example of lacking functionality is the ability to build and run unit tests. The projects are currently not supported by Xamarin Studio. If you want to setup unit tests for for instance your shared .NET functionality you should definitely take a look at NUnit test projects.
You will not use Android Studio a lot with Xamarin development. However its useful for some features regarding publishing to the PlayStore. Signing your packages and actually uploading them is really easy with Android Studio.
The same goes for XCode. You will not develop your code in XCode but sometimes you gotta use it. Probaly mostly for development profile- and certification issues that you are most likely going to have.
Build
As a build and continues integration server I used Visual Studio Team Services(VSTS) a lot. It has great support for mobile development and really empowers your mobile dev ops cycle. It has great build in support for building your mobile apps, testing them and pushing them to the next step in your dev ops cycle.
Generally speaking I took the following approach. I set up a Git- or used an existing Tfs repository. I developed my App and shared as much code as possible in my shared portable class libraries. I used dependency frameworks to make sure that my shared code was unit testable. I then wrote unit tests to verify my feature after developing it. I didn't took the test driven development approach since you have to match your code to two vendors, iOS and Android, and its therefore hard to predict how your code will finally end up. Sometimes you gotta take different turns to get code working on both platforms.
As stated earlier I used both Git and Tfs as source control. I highly recommend that you use Git as source control for Xamarin projects. Especially when iOS is involved. There is simply no Tfs client for Mac available and that's really a struggle. And also Xamarin Studio only got support for Git source control. If you don't have a choice because you have to hook into an existing Tfs repo than I recommend that you install Eclipse with its Tfs plugin.

Once you have hooked your source control into a continues integration flow you should be able to automatically build your Apps once have you checked in or pushed your code to the Git repo. I recommend that you automatically build your Apps and also run the unit tests.
Building your iOS Apps in VSTS can be a challenge. VSTS doesn't have default build agents with iOS capabilities. Hopefully they will in the future but for now they don't. You will therefore have to hook up your own Mac as a build client in VSTS. Xamarin has some documentation for it but you are more likely to find your answers if you search for VSTS documentation. I used this
blog as a reference to set up my own hosted build agent. Its pretty straight forward but you might encounter some issues with configurations. Keep in mind that you have to spin up your build agent every time you start developing. Otherwise the build will be queued but never build and therefore your whole advantage of having a continues integration flow is gone.
Having this said it is wise to have at least two build flows, one for development and one for testing/acceptance. The dev build flow should not have any test cloud testing in it since that is very time consuming and will cost you a lot of money. It will however have the continues integration switch turned on to notice early build and test failures. Its up to you if you want dev apps pushed to hockey app. I personally don't do this very often since I rather pick up a physical device and test on it rather then pushing it to hockey app and downloading it from there. You can't debug via hockey app any way so its kinda pointless. The test/acceptance flow however should do a full unit and test cloud test prior to pushing it to hockey app. You will probably won't release a new test or acceptance app more than once a day so your test cloud hours will not be burned up to quick. Note that testing on test cloud can take some serious time, I have head some tests than ran for half on hour on 3 different devices so if you want to release quick keep that in mind.
Test

Once your Android and iOS apps are build at every code change you are ready for automated testing. First of all make sure that your unit tests cover most of your shared code. Its very important to make sure that your tests succeed without the presence of a backend. Most Apps connect with some other API but these API's should be mocked. Dependency injection is the keyword the get this to work. With dependency injection it is easy to mock your API by mocking an HttpClient.

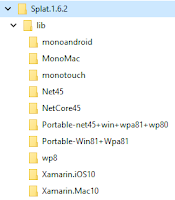
Make sure that you don't use just one of the many Dependency Injection frameworks. They have to be compatible with your PCL's profile. Some NuGet packages won't be available for your profile. I used
Splat since its easy to use and compatible with almost all profiles. Its even available for Xamarin MacOS projects. For mocking I used
Moq. Mocking Nuget packages don't have to match difficult profiles since they only apply on your testing projects, and these are mostly regular .Net framework projects.
After unit testing your code you should start with building automated UI tests. This often te most overlooked and skipped step in the dev ops cycle. However its crucial when your applications grows larger. Building a solid regression test set that hits every aspect of your UI helps to find bugs earlier in the dev ops cycle. This does apply for a lot of applications such as websites, desktop apps and mobile apps. However on the mobile platform its even more important. This is caused by the very large range of devices that possibly run your App. Especially Android has literally thousands of different Android OS versions with their own resolutions and such. This significantly improves the chance that your App will have bugs on some configurations. Does this mean that you have to cover all devices with your automated tests? Luckily no, you'll have to invest in the most common devices and run your UI tests prior to every release.
Xamarin's test cloud is a great platform for automated UI tests. The downside of the platform is that its rather expensive. You pay for test hours and prices range from 99$ a month for 1 hour a day up to 799$ for 10 hours a day. Hooking up your continues integration to your UI test may burn up your test cloud hours really fast so be careful with that. I highly recommended to take at least the 99$ plan and make sure that Apps are UI tested before you send them to your in-person testers or even to the stores. Make sure that you burn up the hours you buy by building a solid regression set.

Keep in mind that test cloud is rather slow. It can easily take up several minutes per device to finish your tests. You will be in the queue a lot. I highly recommend that you write your iOS tests in Xamarin Studio instead of Visual Studio. Running your tests on a simulator will have significant overhead in Visual Studio. Its spins up and shuts down the simulator for every request. Also keep in mind that your app is build with the ENABLE_TEST_CLOUD compiler constant. This also applies to the build you have configured in VSTS. If you want to test your app in test cloud than you will have to build it in debug mode.
Accept
I'll share my experience with
HockeyApp in the near future.
* HockeyApp upload from VSTS
* TestCloud integration
* Feedback via HockeyApp
* Crash Reports
Deploy
I'll share my experience with deploying to the App Stores in the near future.
 As announced yesterday at Connect #MSFTConnect, Microsoft plans to merge several acquired products into a new product, named Visual Studio Mobile Center. It will be, as they call it, a mission control center for your mobile apps. Nowadays Microsoft has several products scattered over several ecosystems and they plan to bring it together in one product.
 So what will it contain? Well as you might know Microsoft acquired HockeyApp in late 2014. HockeyApp then joined forces with the Application Insights team. They strengthened their vision on crash reporting and gathering analytics for your apps. I have even heard that in the near future you should be able to correlate your analytics from your App with the analytics from your back-end. This will bring new exciting insights into your software. Next to that HockeyApp is also great at beta testing and distributing your Apps, I personally don't expect that Microsoft will change a lot here, but that's only for the better since it already works excellent in HockeyApp.


